PuTTY SSH public key
 This tutorial explains how you can replace password-based SSH authentication with key-based authentication which is more secure because only the people that own the key can log in. In this example, we're using PuTTY as our SSH client on a Windows system.
2. Generate a private and public key pair
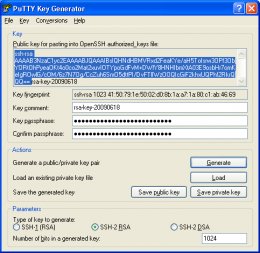
Open PuTTYgen.exe, press Generate button, move mouse. Once the keys are generated, type your key passphrase (choose a "hard to guess" one). Save Public key. Save Private key.
3. Configure your Linux server (create user, save public key)
For this guide let's assume you regular login name is autotimesheet (replace it with one that you use regularly).
adduser autotimesheet -disabled-password
You will be asked to fill in some details such as the user's real name (empty string is fine).
Now type:
su autotimesheet
cd /home/autotimesheet
mkdir .ssh
chmod 700 .ssh
cd .ssh
Then in that folder, create and edit a file called authorized_keys2.
In there, cut/paste your public ssh key, on ONE LINE (That is very important!!!)
Do not add the [email protected] at the end of the line.
Do not add the BEGIN PUBLIC KEY or
END PUBLIC KEY.
Do not add the rsa-key-20090614 at the end.
Make sure, there is ssh-rsa at the beginning.
It should be something like:
ssh-rsa AAAAB3NzaC1yc2EAAAABJQAAAIBzPeFQv+295iKzuuPH0jA9449pSHVpCwXvCR9EstmYh...
Type:
chmod 600 authorized_keys2


